Documentation / @openassistant/keplergl
KeplerGL Component
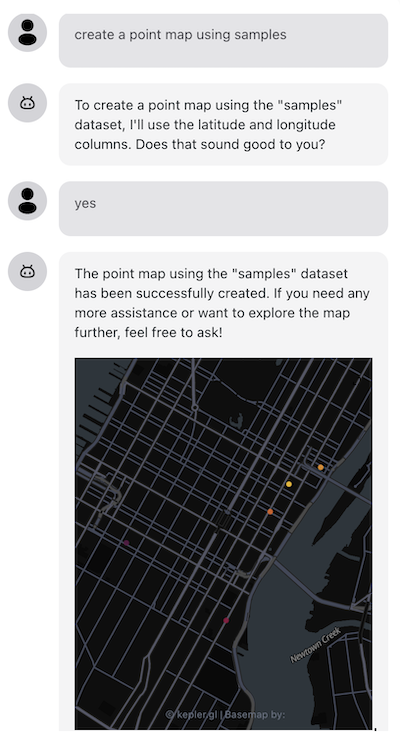
This package provides a component to create a map from your dataset using @openassistant/keplergl. It works with the keplergl tool in the @openassistant/map package.

Features
- ✨ Interactive Maps: Create rich, interactive maps from your datasets
- 🎨 Customizable Styling: Support for color mapping and layering
- 📏 Resizable Interface: Drag the bottom-right corner to resize the map component
- 🔧 Flexible Configuration: Easily integrate with various data sources
Installation
yarn add @openassistant/keplerglNote: please see the common issues below for some common issues and solutions.
Resizable Feature
The KeplerGlComponent supports interactive resizing when used as a tool call component! The resizing functionality is provided by the ResizableToolCallContainer wrapper, which means any tool call component automatically gets resizable functionality.
How to Use Resizing:
- When the component is rendered as a tool call result, hover over it to see the resize handle
- Drag the bottom-right corner to adjust the width and height
- The map will automatically adjust its layout to the new dimensions
Architecture:
- Automatic: Resizing is automatically applied to all tool call components
- Consistent: All tool components get the same resizable experience
- Optimized: Uses throttled resize handling for smooth performance
- Configurable: The container provides sensible defaults but can be customized
Default Behavior:
- Default size: 800px × 400px
- Minimum size: 300px × 200px
- Resize handles: Bottom, right, and bottom-right corners
- Visual feedback: Subtle border and resize handle on hover
The component will show a subtle border and resize handle when you hover over it, making it easy to identify when resizing is available.
For Direct Usage:
If you're using KeplerGlComponent directly (not as a tool call), you can wrap it with your own resizable container or use the provided dimensions via the width and height props:
<KeplerGlComponent
  datasetId="myVenues"
  layerId="points"
  datasetForKepler={dataset}
  width={800}
  height={400}
/>
Usage
Suppose you have a dataset which could be fetched from your data API. The json data could look like this:
const SAMPLE_DATASETS = {
  myVenues: [
    { "location": "New York", "latitude": 40.7128, "longitude": -74.0060, "revenue": 12500000, "population": 8400000 },
    { "location": "Los Angeles", "latitude": 34.0522, "longitude": -118.2437, "revenue": 9800000, "population": 3900000 },
    { "location": "Chicago", "latitude": 41.8781, "longitude": -87.6298, "revenue": 7200000, "population": 2700000 },
    { "location": "Houston", "latitude": 29.7604, "longitude": -95.3698, "revenue": 6800000, "population": 2300000 },
    { "location": "Phoenix", "latitude": 33.4484, "longitude": -112.0740, "revenue": 5400000, "population": 1600000 },
    { "location": "Philadelphia", "latitude": 39.9526, "longitude": -75.1652, "revenue": 5900000, "population": 1580000 },
    { "location": "San Antonio", "latitude": 29.4241, "longitude": -98.4936, "revenue": 4800000, "population": 1540000 },
    { "location": "San Diego", "latitude": 32.7157, "longitude": -117.1611, "revenue": 5200000, "population": 1420000 }
  ]
};
You can share the meta data of your dataset in the instructions prop of the AiAssistant component, so the LLM can understand which datasets are available to use when creating a map.
INFO
The meta data is good enough for the AI Assistant. Don't put the entire dataset in the context, and there is no need to share your dataset with the AI Assistant or the LLM models. This also helps to keep your dataset private.
const instructions = `You can help users to create a map from a dataset.
Please always confirm the function calling and its arguments with the user.

Here is the dataset are available for function calling:
DatasetName: myVenues
Fields: location, longitude, latitude, revenue, population`;
Add the keplergl tool in your application
import { keplergl, KeplerglTool } from '@openassistant/keplergl';

// use KeplerglTool for type safety
const keplerglTool: KeplerglTool = {
  ...keplergl,
  context: {
    ...keplergl.context,
    getDataset: async ({ datasetName }) => SAMPLE_DATASETS[datasetName],
    config: {
      isDraggable: false,
    },
  },
};
Add OpenAssistant Chat component in your application
import { AiAssistant } from '@openassistant/ui';
// only for React app without tailwindcss
// import '@openassistant/keplergl/dist/index.css';

<AiAssistant
  name="Kepler.gl Tool"
  modelProvider="openai"
  model="gpt-4o"
  apiKey={process.env.OPENAI_API_KEY || ''}
  welcomeMessage="Welcome to the Kepler.gl Tool Example! You can ask me to create a map from a dataset."
  instructions={instructions}
  functions={{ keplergl: keplerglTool }}
  useMarkdown={true}
/>;
See the example for more details.
Common Issues
Polyfills
If you are using esbuild, you can use esbuild-plugin-polyfill-node to add the polyfills in your esbuild.config.mjs file.
import { polyfillNode } from 'esbuild-plugin-polyfill-node';

plugins: [polyfillNode()],
If you are using Docusaurus, you can use docusaurus-node-polyfills to add the polyfills.
Styled Components
There are multiple versions of styled-components in the kepler.gl package, you need to tell your bundler to use the same version to avoid conflicts.
You can use the resolutions field in your package.json to force the same version.
"resolutions": {
  "styled-components": "6.1.8"
}
If you are using esbuild, you can add the following configuration of alias to your esbuild.config.mjs file to avoid conflicts.
alias: {
  'styled-components': path.resolve(__dirname, 'node_modules/styled-components'),
}
If you are using webpack, you can add the following configuration of alias to your webpack.config.js file to avoid conflicts.
resolve: {
  alias: {
    'styled-components': path.resolve(__dirname, 'node_modules/styled-components'),
  },
},