Get Started
Kepler.gl AI Assistant is a plugin for Kepler.gl that allows you to perform spatial data analysis and visualization using AI.
Start AI Assistant
To use AI Assistant, you can click the "AI Assistant" button in the top right corner of the Kepler.gl UI.
Configure AI Assistant
You will see the AI Assistant configuration panel on the right side of the Kepler.gl UI. You can adjust the width of the panel by dragging the border between the panel and the Kepler.gl UI.
The configuration panel includes several important settings:
AI Provider
Select your preferred AI provider from the dropdown menu. Currently supports:
- OpenAI - OpenAI's GPT models
- Google - Google's Gemini models
- Anthropic - Anthropic's Claude models
- Deepseek - Deepseek's chat models
- XAI - xAI's Grok models
- Ollama - Local models via Ollama
Select LLM Model
Choose the specific language model that supports tools to use for AI interactions. Available options vary by provider:
| Provider | Available Models |
|---|---|
| OpenAI | gpt-4.1, gpt-4o, gpt-4o-mini, gpt-4, gpt-3.5-turbo, o1, o1-preview, o1-mini |
| gemini-2.5-flash-preview-04-17, gemini-2.5-pro-preview-05-06, gemini-2.0-flash, gemini-1.5-flash, gemini-1.5-pro | |
| Anthropic | claude-3.7-sonnet, claude-3.5-sonnet, claude-3.5-haiku, claude-3-opus, claude-3-sonnet, claude-3-haiku |
| XAI | grok-3, grok-3-fast, grok-3-mini, grok-3-mini-fast |
| Deepseek | deepseek-chat |
| Ollama | Custom models (check "Input Model Name" to manually enter a custom model name) |
For more details, please visit the documentation https://ai-sdk.dev/providers/ai-sdk-providers#provider-support
Authentication
For Cloud Providers (OpenAI, Google, Anthropic, Deepseek, XAI):
- Enter Your API Key - Provide your API key for the selected provider. This is required to authenticate and use the AI services. Your API key is stored locally and used only for making requests to the AI provider.
For example: visit https://platform.openai.com/docs/api-reference to get your OpenAI API key, or visit https://docs.anthropic.com/en/api/getting-started to get your Anthropic API key.
For Ollama (Local):
- Base URL - Enter the base URL for your Ollama instance (default:
http://localhost:11434/api) - Input Model Name - Optionally check this to manually enter a model name instead of selecting from the dropdown
See Ollama documentation for more details: https://ollama.com/docs
Temperature
Control the creativity and randomness of AI responses using the temperature slider:
- 0 (left) - More focused and deterministic responses
- 2 (right) - More creative and varied responses
- Range: 0.0 to 2.0 with 0.1 increments
- Default setting is 0 for more precise analytical responses
Top P
Fine-tune the diversity of AI responses with the Top P parameter:
- 0 (left) - More focused on the most likely responses
- 1 (right) - Consider a broader range of possible responses
- Range: 0.0 to 1.0 with 0.1 increments
- Default setting is 1.0 for comprehensive responses
Mapbox Token (Optional For Route/Isochrone)
If you plan to use routing or isochrone analysis features, you can optionally provide your Mapbox access token. This enables advanced spatial analysis capabilities like:
- Route e.g. "What is the driving route from 123 Main St to 456 Main St in San Francisco?"
- Isochrone e.g. "What is the 30-minute travel time isochrone from 123 Main St in San Francisco?"
Use AI Assistant
If the connection to the selected AI provider is successful, you will see the AI Assistant chat interface.
Welcome Message: You'll be greeted with "Hi, I am Kepler.gl AI Assistant!" confirming that the assistant is ready to help with your spatial analysis tasks.
Suggested Actions: The interface displays helpful suggestion buttons to get you started quickly based on the dataset loaded in Kepler.gl. For example, in the screenshot above:
- Create a Bubble Chart: "Visualize the relationship between AGE_2..." - Helps you create scatter plots and bubble charts to explore relationships between variables
- Generate a Histogram: "Show the distribution of AGE_LT_21..." - Assists in creating histograms to understand the distribution of your data
Prompt Input: Use the "Enter a prompt here" field to type your questions, requests, or commands in natural language.
TIP
some useful prompts: what datasets are available to use? what tools are available to use?
Tips for Effective Prompting
- Be specific: Include details about the data columns, analysis type, or visualization you want
- Use examples: Reference specific field names or geographic areas in your dataset
- Ask follow-up questions: Build on previous responses to refine your analysis
- Experiment: Try different phrasings if the first attempt doesn't give you the desired result
Additional Features
The AI Assistant includes several advanced features to enhance your interaction experience:
Screenshot to Ask
Click the "Screenshot to Ask" button to capture specific areas of your map or interface and ask questions about them.

How to use screenshot to ask?
Taking Screenshots
- Click the "Screenshot to Ask" button in the chat interface
- A semi-transparent overlay will appear
- Click and drag to select the area you want to capture
- Release to complete the capture
Asking Questions
- After capturing, the screenshot will be attached to your next message
- Type your question about the captured area
- Send your message to get AI assistance
Managing Screenshots
- Click the "X" button on the screenshot preview to remove it
- Use onRemoveScreenshot callback for programmatic removal
Talk to Ask (Voice-to-Text)
The voice-to-text feature allows users to record their voice, which will be converted to text using the LLM.
How to use voice-to-text?
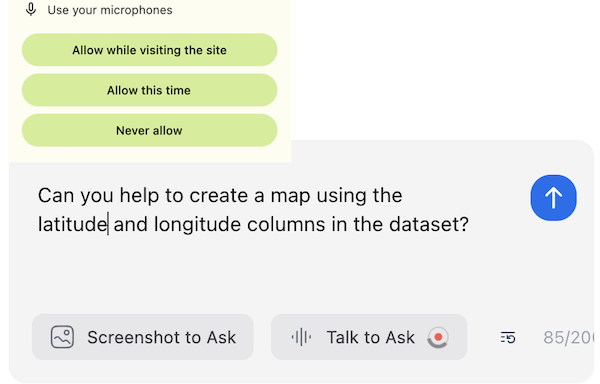
When using the voice-to-text feature for the first time, users will be prompted to grant microphone access. The browser will display a permission dialog that looks like this:
Users can choose from three options:
- Allow while visiting the site: Grants temporary microphone access
- Allow this time: Grants one-time microphone access
- Never allow: Blocks microphone access
Then, user can start recording their voice. User can stop recording by clicking the stop button or by clicking the microphone icon again. The text will be translated by LLM and displayed in the input box.
This feature is only available with certain AI providers:
- OpenAI (using Whisper model)
- Google (using Gemini)
If using an unsupported provider, you'll receive a "Method not implemented" error.